Thu 28 Aug 2008

POLICE DEPARTMENT OFFERED TO USE CITY GOVT’S COMMAND & CONTROL SYSTEM.

13 Jun 2008:

Karachi. June 13:  The City Government Karachi has offered police department to use its command and control centre, recently established at the civic centre, for controlling crimes, terrorist attacks and monitoring traffic.

The offer was made by City Nazim Syed Mustafa Kamal during a briefing to media representatives on Command and Control Centre on Friday. The project which is first of its kind in Pakistan will be officially inaugurated on Sunday. Under the system full video monitoring of two model corridors (signal free corridor-I&II) of the city will be made through a sophisticated wireless video security surveillance network while the system will be gradually extended to other areas of the city.

The city government has acquired all technical expertise and equipments for this project. The first phase of the project has been completed with a cost of Rs.1100 millions under which 54 cameras have been installed on both signal free corridors and the centre has begun working on experimental basis.

Giving more details of the project the City Nazim said that latest Wimax technology has been used in this system while the experts from United States and Europe were hired for training of the staff. Within two weeks the system will also be linked with a most modern ambulance system so that in case of any emergency it could be dispatched to the site of the accident. The ambulances have been purchased from Mercedes Benz Company.

Nazim Karachi said the latest Wimax Technology has been used for cameras and all technology hardware and software have been imported from USA and European countries. In order to provide fool proof security and reliability to the system the whole network is on a licensed band from PTA which is used for public safety around the world. He said that the physical security and surveillance is the front line against criminal and terrorism threats, now a days it is the top priority for every government to provide the safe and secure environment for their citizens and guard its infrastructure by adopting any available technology that can be used to resolve the traffic congestion and also help to reduce street crimes.

The City Nazim said that the project was launched in January 2008 and now its first phase has been completed. The whole project took only six months to complete with all international standards. He said that it was a hard job to do as being first of its kind in Pakistan it was much difficult to introduce a new thing.

The wireless network coverage area is 36km with fiber optic back up. Mainly 54 cameras have been installed to cover two main arteries of Karachi known as Signal Free Corridor-I(from SITE to Karzas and Sharae Faisal) and Signal Free Corridor-II( from Nagan Chowrangi to Drigh Road and Sharae Faisal)

Nazim Karachi said that the main objectives of this system were to improve the physical security of citizen thorough video security cameras and to monitor the traffic flow and clear congestion on the roads through worldʼs best available technology. To Guard the CDGK infrastructure such as flyovers, underpasses and bridges and closely coordinate and work with traffic police along with Sindh crime Police in command and control centre to respond to law and order situation effectively were other objectives of the project. He said that the next phase of this project will include installation of the LPR (License Plate Recognition) Biometric Face Recognition and RFID system after which it would become very easy to identify the movements on streets of individuals, cars and other type of transit measure while it will be difficult for anyone to evade the law enforcement agencies.


Reference karachicity.gov.pk

Categories : Knowledge / Amazing
Comments (1)
Wed 16 Jul 2008

Quantum information technology

Enigma variations

Jul 10th 2008
From The Economist print edition

Quantom atricle.jpg

A device that counts photons will secure optical data networks from prying eyes

REMOVE the outer coating from a strand of optical fibre, bend it and attach a sensor to detect the tiny amount of light that will leak out. Hacking into an optical network like this is the modern equivalent of a wire tap. But now a laboratory in Cambridge, England, has found a way to turn a hacker’s screen instantly blank if he infiltrates the network. This is because the data are being encrypted in a new and probably unbreakable way with one of the first practical devices to be developed for quantum information technology.

The idea of using the more arcane aspects of quantum theory to do things that standard information technology cannot manage has been around for a while. One branch of the field is quantum computing. This, if it can be made to work routinely, promises machines that can do lots of calculations in parallel instead of one at a time, and thus solve problems existing computers cannot manage. The other branch is quantum cryptography, which promises unbreakable codes for messages.

Q’s laboratory

The device in question is a photon detector. That is not very exciting by itself, but this detector counts single photons (the particles of which light is composed)—and can do so at room temperature. Most quantum systems are upset by heat. Orion, for example, operates near absolute zero, and previous attempts to build single-photon detectors have suffered similar constraints. Dr Shields’s device, however, is a simple modification of the sort of equipment that is already used to detect multiple photons, and should thus be easy to deploy.

Such devices, known as avalanche photodiodes, rely on the fact that when a photon hits a semiconductor it often knocks an electron out of place, creating a positively charged “hole” in the crystal lattice in the place where the negatively charged electron used to be. If an electric charge is applied to the crystal, these holes and electrons will move in opposite directions, knocking into the lattice and creating more and more holes. The resulting cascade of electrons and holes is easy to detect, showing that light has struck.

What is not easy to work out is exactly how many photons have arrived. To do that, you need to look at the signal just after it has been created, when its size bears some relation to the number of holes that started it. At that point, though, the signal is small compared with the electronic “noise” caused by the machine’s operation. What Dr Shields did was to work out a way of subtracting the noise, and thus extracting the signal.

Such a photon counter is essential if quantum cryptography is to work, because it will allow what are known as quantum repeaters to be built. In a classical telecommunications system the signal has to be boosted by a repeater every 80km or so. But a traditional repeater destroys the quantum states of the photons, such as their planes of polarisation. That does not matter for classical telecoms, but matters very much for quantum cryptography, which relies on the fact that no eavesdropper can intercept the message without changing those quantum states, and thus giving away the fact that he is on the line.

Dr Shields’s photon detector, however, permits cryptographers to use a phenomenon called quantum entanglement to make a repeater that does not destroy quantum states. Entangled photons share quantum states.

Such a quantum repeater uses groups of three photons for each bit of the message. One—call it A—is part of the original transmission. The other two, B and C, are created further down the line in an entangled state, and sent off in different directions. C goes to the recipient while B is fed into a device called a beam-splitter, where it meets A. The purpose of the beam-splitter is to compare the quantum states of A and B. If they are the same, the two photons will come out of the beam-splitter together. Since B and C have the same quantum states, that means C also has the same quantum state as A. If A and B are different, they will come out of the beam-splitter in one of three different places, depending on exactly which way they are different. The information from the beam-splitter is then transmitted separately to the recipient, so that he knows whether to accept C unaltered as part of the message, or apply one of three mathematical transformations to it, to arrive at the right result (this does not compromise secrecy, since any eavesdropper will not know what the transformation needs to be applied to). It is for this reason that you need a device, such as Dr Shields’s, which can detect and count individual photons as they come out of different parts of the beam-splitter. Now that there is one, the eavesdropper’s days may be numbered.

Source : http://www.economist.com/science/displayStory.cfm?source=hptextfeature&story_id=11703138


Comments here
Fri 4 Jul 2008

Web Service Security using SOAP Extension


Yesterday I was trying to secure my webserice from unauthorized use.

Although there are many ways to secure webservices. Using WSE, WS-security, SOAP Extension, restricting through IP access, implementing certificates etc etc etc.


WSE would be the comfortable way but in my case it was time consuming to implement at both server and client end as there were hundreds of services. Restricting IP throu IIS or http handler / modules would be a good choice. I tried to do it with SOAP Extension that could be plug and play with a single entry in web.config. It works like httpmodule that reside in pipeline of communication between client and server.


Here after enough googling I have a very simple SOAP Extension that would help anyone if just want to secure service that request is coming from authenticated source. Although there would be still many security breaches but here you go.


What this SOAP extension will do?

Before passing request to webserver, this extension will add a string or any unique token to header of SOAP message then will pass it over network. Before server entertain the request it will look for that token or string in the header of incoming SOAP message request. If exsit then will allow to consume service else will throw an exception or whatever the action depending upon scenario.


SOAP Message Lifecycle.


Client = Going to accessing service

Server = Where service exists and entertaining client request.
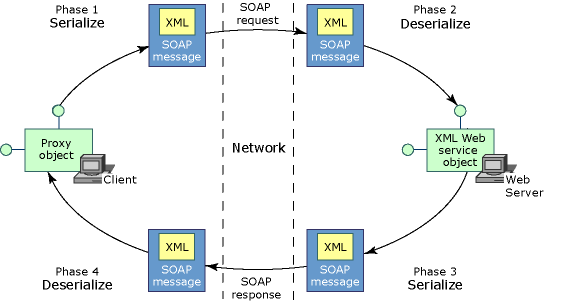


SOAPExtension Life.gif


Client side

1.    A client invokes a method on the proxy class.

2.    A new instance of the SOAP extension is created on the client.

3.    If this is the first time this SOAP extension has executed with this XML Web service on the client, then the GetInitializer method is invoked on the SOAP extension running on the client.

4.    The Initialize method is invoked.

5.    The ChainStream method is invoked.

6.    The ProcessMessage method is invoked with the SoapMessageStage set to BeforeSerialize.

7.    ASP.NET on the client computer serializes the arguments of the XML Web service method into XML.

8.    The ProcessMessage method is invoked with the SoapMessageStage set to AfterSerialize.

9.    ASP.NET on the client computer sends the SOAP message over the network to the Web server hosting the XML Web service.


Server side

1.    ASP.NET on the Web server receives the SOAP message.

2.    A new instance of the SOAP extension is created on the Web server.

3.    On the Web server, if this is the first time this SOAP extension has executed with this XML Web service on the server side, the GetInitializer method is invoked on the SOAP extension running on the server.

4.    The Initialize method is invoked.

5.    The ChainStream method is invoked.

6.    The ProcessMessage method is invoked with the SoapMessageStage set to BeforeDeserialize.

7.    ASP.NET deserializes the arguments within the XML.

8.    The ProcessMessage method is invoked with the SoapMessageStage set to AfterDeserialize.

9.    ASP.NET creates a new instance of the class implementing the XML Web service and invokes the XML Web service method, passing in the deserialized arguments. This object resides on the same computer as the Web server.

10.  The XML Web service method executes its code, eventually setting the return value and any out parameters.

11.  The ProcessMessage method is invoked with the SoapMessageStage set to BeforeSerialize.

12.  ASP.NET on the Web server serializes the return value and out parameters into XML.

13.  The ProcessMessage method is invoked with the SoapMessageStage set to AfterSerialize.

14.  ASP.NET sends the SOAP response message over the network back to the XML Web service client.


Client side

1.    ASP.NET on the client computer receives the SOAP message.

2.    The ProcessMessage method is invoked with the SoapMessageStage set to BeforeDeserialize.

3.    ASP.NET deserializes the XML into the return value and any out parameters.

4.    The ProcessMessage method is invoked with the SoapMessageStage set to AfterDeserialize.

5.    ASP.NET passes the return value and any out parameters to the instance of the proxy class.

6.    The client receives the return value and any out parameters.


Here what exactly the code contains.

There are three classes.

MyHeader.cs

That will contain our security token or string that server will be looking for.


using System;

using System.Collections.Generic;

using System.Text;

using System.Web.Services.Protocols;

using System.Xml.Serialization;


    [Serializable]

    public class MyHeader : SoapHeader

    {

        private string _MyHeaderValue;


        public string MyHeaderValue

        {

            get { return _MyHeaderValue; }

            set { _MyHeaderValue = value; }

        }

    }


MySOAPExtensionClient.cs

SOAP Extension that will add security token in header header to outgoing SOAP message


using System;

using System.Web.Services;

using System.Web.Services.Protocols;

using System.IO;

using System.Net;

using System.Diagnostics;


    public class MySOAPExtensionClient : System.Web.Services.Protocols.SoapExtension

    {

        Stream oldStream;

        Stream newStream;


        public override object GetInitializer(LogicalMethodInfo methodInfo, SoapExtensionAttribute attribute)

        {

            return null;

        }


        public override object GetInitializer(Type WebServiceType)

        {

            return null;

        }


        public override void Initialize(object initializer)

        {

            return;

        }


        // Save the Stream representing the SOAP request or SOAP response into

        // a local memory buffer.

        public override Stream ChainStream(Stream stream)

        {

            oldStream = stream;

            newStream = new MemoryStream();

            return newStream;

        }


        public override void ProcessMessage(SoapMessage message)

        {

            switch (message.Stage)

            {

                case SoapMessageStage.BeforeSerialize:

                    if (message is SoapClientMessage)

                        AddHeader(message);

                    break;

                case SoapMessageStage.AfterSerialize:

                    newStream.Position = 0;

                    Copy(newStream, oldStream);

                    break;

                case SoapMessageStage.BeforeDeserialize:

                    Copy(oldStream, newStream);

                    newStream.Position = 0;

                    break;

                case SoapMessageStage.AfterDeserialize:

                    break;

            }

        }


        private void AddHeader(SoapMessage message)

        {

            MyHeader header = new MyHeader();

            header.MyHeaderValue = "MyValue";

            header.MustUnderstand = false;

            message.Headers.Add(header);

        }


        private void Copy(Stream from, Stream to)

        {

            TextReader reader = new StreamReader(from);

            TextWriter writer = new StreamWriter(to);

            writer.WriteLine(reader.ReadToEnd());

            writer.Flush();

        }

    }


MySOAPExtensionServer.cs

SOAP Extension that will will expect a security token or string in incoming SOAP request.


using System;

using System.Web.Services;

using System.Web.Services.Protocols;

using System.IO;

using System.Net;

using System.Diagnostics;


    public class MySOAPExtensionServer : System.Web.Services.Protocols.SoapExtension

    {

        Stream oldStream;

        Stream newStream;


        public override object GetInitializer(LogicalMethodInfo methodInfo, SoapExtensionAttribute attribute)

        {

            return null;

        }


        public override object GetInitializer(Type WebServiceType)

        {

            return null;

        }


        public override void Initialize(object initializer)

        {

            return;

        }


        // Save the Stream representing the SOAP request or SOAP response into

        // a local memory buffer.

        public override Stream ChainStream(Stream stream)

        {

            oldStream = stream;

            newStream = new MemoryStream();

            return newStream;

        }


        public override void ProcessMessage(SoapMessage message)

        {

            switch (message.Stage)

            {

                case SoapMessageStage.BeforeSerialize:

                    break;

                case SoapMessageStage.AfterSerialize:

                    newStream.Position = 0;

                    Copy(newStream, oldStream);

                    break;

                case SoapMessageStage.BeforeDeserialize:

                    Copy(oldStream, newStream);

                    newStream.Position = 0;

                    break;

                case SoapMessageStage.AfterDeserialize:

                    if (message is SoapServerMessage)

                    {

                        if (!IsRequestValid(message))

                        {

                            LoggerSecurity.GetInstance().WriteLog("Invalid Service Call | Action = " + message.Action + " | Url = " + message.Url);

                            throw new SoapException("Invalid Service Call", SoapException.ClientFaultCode);

                        }

                    }

                    break;

            }

        }


        private bool IsRequestValid(SoapMessage message)

        {

            bool result = false;

            try

            {

                foreach (SoapHeader header in message.Headers)

                {

                    if (header is MyHeader)

                    {

                        MyHeader head = (MyHeader)header;

                        if (head.MyHeaderValue.Equals("MyValue"))

                            result = true;

                    }


                    else if (header is SoapUnknownHeader)

                    {

                        System.Xml.XmlElement elem = ((SoapUnknownHeader)header).Element;

                        if (elem.Name.Equals("MyHeader"))

                        {

                            System.Xml.XmlNode node = elem.SelectSingleNode("/");

                            if (node != null && node.InnerText.Equals("MyValue"))

                                result = true;

                        }

                    }

                }

            }

            catch (Exception ex)

            {

                LoggerSecurity.GetInstance().WriteLog(ex);

            }

            return result;

        }


        private void Copy(Stream from, Stream to)

        {

            TextReader reader = new StreamReader(from);

            TextWriter writer = new StreamWriter(to);

            writer.WriteLine(reader.ReadToEnd());

            writer.Flush();

        }

    }


In Client Web.Config before ending system.Web section add following


        <webServices>

              <protocols>

                    <remove name="HttpGet" />

                    <remove name="HttpPost" />

                    <remove name="HttpPostLocalhost" />

                    <remove name="Documentation" />

              </protocols>

              <soapExtensionTypes>

                    <add type="CustSoapExtension.MySOAPExtensionClient, CustSoapExtension" priority="1" group="High"/>

              </soapExtensionTypes>

        </webServices>


  </system.web>


In Server Web.Config before ending system.Web section add following


        <webServices>

              <protocols>

                    <remove name="HttpGet" />

                    <remove name="HttpPost" />

                    <remove name="HttpPostLocalhost" />

                    <remove name="Documentation" />

              </protocols>

              <soapExtensionTypes>

                    <add type="CustSoapExtension.MySOAPExtensionClient, CustSoapExtension" priority="1" group="High"/>

              </soapExtensionTypes>

        </webServices>


  </system.web>


Why these?

                    <remove name="HttpGet" />

                    <remove name="HttpPost" />

                    <remove name="HttpPostLocalhost" />

                    <remove name="Documentation" />


On production environment, if there is required only to consume webservices using only SOAP then don’t allow aceess to service using these protocoals. Only allow SOAP protocol.


Hope this sample code will help you to improve your security concern.


Comments (3)
Tue 24 Jun 2008


Configuration File Tampering

If Configuration files are not protected then you should use the file system access control list (ACL) to protect them.


System Registry Tampering

If registry entries are not protected then you should use the registry ACL to protect them.


Repudiation / Logging

Security exceptions should be logged for auditing purposes; therefore, you should define and implement logging and auditing strategies in the code. Push security exceptions–related information to the event log.


Assembly Tampering

To prevent assembly tampering, consider implementing Authenticode signatures for these assemblies.


Authentication and Authorization

You should consider various Internet, intranet, and extranet-based deployment for Web servers and database servers, and then implement appropriate authentication mechanisms.


Message Protection

You should implement transport-level security (secure socket layer [SSL]) to further strengthen the communication channel. You can also implement IPsec to secure communication channel between services and the database. To implement message-level security, use either WSE 3.0 or WCF to sign and encrypt messages. Choose appropriate certificates and encryption algorithms to enforce security without compromising business operations and performance.


HTTP Replay
Attacks

You can prevent these attacks by providing a secure end-to-end communication channel between server and client (for example, SSL). You should also uniquely authenticate each request (for example, use a timestamp and digital signature), by implementing message-level security. Implement IP lockout policies if required.


Denial of Service

You can prevent denial of service attacks by implementing strong authentication, authorization, and request validation mechanisms. Also, you should uniquely authenticate each request (for example, use a timestamp and digital signature) by implementing message-level security.


Repudiation

You can prevent repudiation attacks by implementing strong authentication, authorization, and request validation mechanisms. Also, you should implement the history and auditing feature for any database operations. You should not permanently delete the records from the database.


Dictionary Attack or Password Brute Force
Attack

You should try to prevent dictionary attacks or password brute force attacks. Implement strong password policies to prevent password hijacking. Implement a maximum retries policy, and disable the account if the number of attempts exceeds the maximum number. Also, implement an IP lockout policy, if required. Implement auditing and logging for service contracts / Web server / service host access.


Spoofing

You can prevent spoofing attacks by implementing strong authentication, authorization, and request validation mechanisms.


Database Security Access Controls

Use an account that has restricted permissions in the database. Ideally, you should grant execute permissions only to selected stored procedures. Consider using database role and application role database security concepts to access a different set of database objects. For example, consider using different sets of database roles and application roles for read-only operations and read-write operations.


Configuration Files Clear Text Secrets

To protect your connection strings, secret app settings, consider using DPAPI to encrypt them and store clear text secrets in a restricted registry. Use file ACLs to control access to configuration files.


Database Clear Text Secrets

The database contains secrets in clear text. For a production application, you should consider encrypting sensitive data.


Web Service Documentation Protocol

The Web.config file allows a malicious user to see the Web service documentation (wsdl file) by using documentation protocol. Using this information, the malicious user can get information about all data contracts and service contract details. The malicious user can then use the details to launch brute force attacks or false request attacks. You should configure the Web.config file to disable the documentation protocol.


Debug Attribute

The host program configuration file allows debugging. The Web.config file describes the debug = true attribute, which can allow the malicious user to debug the service implementation. This opens extra surface area, which allows a malicious user to explore injection threats. To prevent this type of attack, configure debug = false in the Web.config file.


CustomErrors Mode Attribute

The host program configuration file allows debugging. The Web.config file describes the CustomErrors Mode = off attribute, which can allow the malicious user to see the complete debug information in case of errors or exceptions. A malicious user can get the call stack information, which can launch injection or code malfunction attacks. To prevent this type of attack, configure CustomErrors Mode = on and make sure that the defaultUrl is appropriately configured in the Web.config file.


PersistSecurityInfo Attribute

The database connection string in the Web.config file does not contain a definition for the PersistSecurityInfo attribute. This attribute should be set to false. When set to false, sensitive information, such as the password, is not returned as part of the connection if the connection is open or has ever been in an open state. Resetting the connection string resets all connection string values, including the password. Set the PersistSecurityInfo attribute to false in the connection string.


SqlClientPermission Attribute

The database access assembly does not define the code access security attribute SqlClientPermission.

The CustomerRepository assembly should request minimum security permissions for SqlClientPermission.


Unrestricted Base Classes

When developing classes that will be deployed to a production environment, you should consider using sealed attributes for classes and methods.


Comments (1)
Tue 24 Jun 2008

For detail please visit following link :

http://msdn.microsoft.com/en-us/library/ms998310.aspx

Forms Authentication is one of three authentication providers. Windows Authentication and Passport Authentication make up the other two providers. In this article, we will focus on Forms Authentication

ASP.NET authentication provider

Description

Forms authentication

A system by which unauthenticated requests are redirected to an HTML form using HTTP client-side redirection. The user provides credentials and submits the form. If the application authenticates the request, the system issues a cookie that contains the credentials or a key for reacquiring the identity. Subsequent requests are issued with the cookie in the request headers; they are authenticated and authorized by an ASP.NET event handler using whatever validation method the application developer specifies.

Passport authentication

Centralized authentication service provided by Microsoft that offers a single logon and core profile services for member sites.

Windows authentication

ASP.NET uses Windows authentication in conjunction with Microsoft Internet Information Services (IIS) authentication. Authentication is performed by IIS in one of three ways: basic, digest, or Integrated Windows Authentication. When IIS authentication is complete, ASP.NET uses the authenticated identity to authorize access.


Forms Authentication Flow

1.    A client generates a request for a protected resource (e.g. a secured page from your site).

2.    IIS (Internet Information Server) receives the request. If the requesting client is authenticated by IIS, the user/client is passed on to the ASP.NET application. Note that if Anonymous Access is enabled, the client will be passed onto the ASP.NET application by default. Otherwise, Windows will prompt the user for credentials to access the server's resources. Also note that because the authentication mode in the ASP.NET application is set to Forms, IIS authentication cannot be used.

3.    If the client doesn't contain a valid authentication ticket/cookie, ASP.NET will redirect the user to the URL specified in the loginURL attribute of the Authentication tag in your web.config file. This URL should contain the login page for your application. At this URL, the user is prompted to enter their credentials to gain access to the secure resource.

4.    The client must provide credentials, which are then authenticated/processed by your ASP.NET application. Your ASP.NET application also determines the authorization level of the request, and, if the client is authorized to access the secure resource, an authentication ticket is finally distributed to the client. If authentication fails, the client is usually returned an Access Denied message.

5.    The client can then be redirected back to the originally-requested resource, which is now accessible, provided that the client has met the authentication and authorization prerequisites discussed above. Once the authorization ticket/cookie is set, all subsequent requests will be authenticated automatically until the client closes the browser or the session terminates. You can have the user's credentials persist over time by setting the authorization ticket/cookie expiration value to the date you desire to have the credentials persist through. After that date, the user will have to log in again.

Setting Up Forms Authentication

Let's take a look at the applicable settings to execute Forms Authentication. In general, setting up Forms Authentication involves just a few simple steps.

1.    Enable anonymous access in IIS. By default, anonymous users should be allowed to access your Web application. In rare cases, however, you may opt to layer an Integrated Windows OS security layer level with Forms authentication. We will discuss how to integrate this layer with anonymous access enabled in the article succeeding this one ("Part 2 (Integration w/ Active Directory)").

2.    Configure your Web application's web.config file to use Forms Authentication. Start by setting the authentication mode attribute to Forms, and denying access to anonymous users. The following example shows how this can be done in the web.config file for your Web application:

3.   

4.  <configuration>

5.    <system.web>

6.      <authentication mode="Forms">

7.        <forms name=".COOKIEDEMO"

8.               loginUrl="login.aspx"

9.               protection="All"

10.             timeout="30"

11.             path="/"/>

12.    </authentication>

13.    <authorization>

14.      <deny users="?" />

15.    </authorization>

16.  </system.web>

17.</configuration>

Upon setting the authentication mode to Forms, you'll notice that we appended another child element. The Forms element has five attributes that implement your forms authentication configuration. The attributes and their descriptions are as follows :

Attribute

Description

name

This is the name of the HTTP cookie from which we will store our authentication ticket and information, respectively.

loginURL

This is the URL from which your unauthenticated client will be redirected. In most scenarios, this would be your login page, where the client is required to provide their credentials for authentication.

protection

This is used to set the method from which to protect your cookie data. The following valid values can be supplied:

All: Specifies to use both data validation and encryption to protect the cookie. Triple DES is used for encryption, if it is available and if the key is long enough (48 bytes). The All
value is the default (and suggested) value.

None
: Used for sites that are only using cookies for personalization and have weaker requirements for security. Both encryption and validation can be disabled. This is the most efficient performance wise, but must be used with caution.

Encryption: Specifies that the cookie is encrypted using Triple DES or DES, but data validation is not done on the cookie. It's important to note that this type of cookie is subject to chosen plaintext attacks.

Validation: Specifies to avoid encrypting the contents of the cookie, but validate that the cookie data has not been altered in transit. To create the cookie, the validation key is concatenated in a buffer with the cookie data and a MAC is computed/appended to the outgoing cookie.

timeout

This is the amount of time (in integer minutes) that the cookie has until it expires. The default value for this attribute is 30 (thus expiring the cookie in 30 minutes).

The value specified is a sliding value, meaning that the cookie will expire
n minutes from the time the last request was received.

path

This is the path to use for the issued cookie. The default value is set to "/" to avoid issues with mismatched case in paths. This is because browsers are case-sensitive when returning cookies.

In our web.config file, it's also important to note the value we have for the deny child element of the authorization section (as highlighted below). Essentially, we set that value of the users attribute to "?" to deny all anonymous users, thus redirecting unauthenticated clients to the loginURL.


<configuration>

  <system.web>

    <authentication mode="Forms">

      <forms name=".COOKIEDEMO"

             loginUrl="login.aspx"

             protection="All"

             timeout="30"

             path="/"/>

    </authentication>

    <authorization>

      <deny users="?" />

    </authorization>

  </system.web>

</configuration>

1.    Create your login page (as referenced in the loginURL attribute discussed above). In this case, we should save our login page as login.aspx. This is the page to where clients without valid authentication cookie will be redirected. The client will complete the HTML form and submit the values to the server. You can use the example below as a prototype.

19. 

20.  <%@ Import Namespace="System.Web.Security " %>

21.<html>

22.  <script language="C#" runat=server>

23.  void Login_Click(Object sender, EventArgs E)

24.  {

25. 

26.    // authenticate user: this sample accepts only one user with

27.    // a name of [email protected] and a password of 'password'

28.    if ((UserEmail.Value == "[email protected]") &&

29.        (UserPass.Value == "password"))

30.    {

31.      FormsAuthentication.RedirectFromLoginPage(UserEmail.Value,

32.                                                PersistCookie.Checked);

33.    }

34.    else

35.    {

36.      lblResults.Text = "Invalid Credentials: Please try again";

37.    }

38.  }

39.  </script>

40.  <body>

41.    <form runat="server">

42.      <h3>Login Page</h3>

43.      <hr>

44.      Email:<input id="UserEmail" type="text" runat="server"/>

45.      <asp:RequiredFieldValidator ControlToValidate="UserEmail"

46.                                  Display="Static"

47.                                  ErrorMessage="*"

48.                                  runat="server"/>

49.      <p>Password:<input id="UserPass"

50.                         type="password"

51.                         runat="server"/>

52.      <asp:RequiredFieldValidator ControlToValidate="UserPass"

53.                                  Display="Static"

54.                                  ErrorMessage="*"

55.                                  runat="server"/>

56.      <p>Persistent Cookie:<ASP:CheckBox id="PersistCookie"

57.                                         runat="server" />

58.      <p><asp:button id="cmdLogin"

59.                     text="Login"

60.                     OnClick="Login_Click"

61.                     runat="server"/>

62.      <p><asp:Label id="lblResults"

63.                    ForeColor="red"

64.                    Font-Size="10"

65.                    runat="server" />

66.    </form>

67.  </body>

68.</html>

It's important to note that the above page authenticates the client on the click event of the cmdLogin button. Upon clicking, the logic determines if the username and password provided match those hard-coded in the logic. If so, the client is redirected to the requested resource. If not, the client is not authorized, and thus receives a message depicting this.

You can adjust the logic to fit your needs, as it is very likely that you will not have your usernames and passwords hard-coded into the logic. It is here at the Login_Click function that you can substitute the logic with that of your own. It is common practice to substitute database logic to verify the credentials against a data table with a stored procedure.

You can also provide authorized credentials in the web.config file. Inside the forms section, you would append a user element(s), as follows :


  <configuration>

  <system.web>

    <authentication mode="Forms">

      <forms name=".COOKIEDEMO"

             loginUrl="login.aspx"

             protection="All"

             timeout="30"

             path="/">

        <credentials passwordFormat="Clear">

          <user name="user1" password="password1"/>

          <user name="user2" password="password2"/>

          <user name="user3" password="password3"/>

        </credentials>

      </forms>

    </authentication>

    <authorization>

      <deny users="?" />

    </authorization>

  </system.web>

</configuration>

Doing so allows you to authenticate against a list of users in your web.config file, easily. You can append as many users as necessary. To authenticate against that list of users, you would append the applicable logic in the click event of the cmdLogin button discussed above. Here is the code :


void Login_Click(Object sender, EventArgs E)

{

  // authenticate user: this sample authenticates

  // against users in your app domain's web.config file

  if (FormsAuthentication.Authenticate(UserEmail.Value,

                                       UserPass.Value))

  {

    FormsAuthentication.RedirectFromLoginPage(UserEmail.Value,

                                              PersistCookie.Checked);

  }

  else

  {

    lblResults.Text = "Invalid Credentials: Please try again";

  }

}

Client Requirements

To enable forms authentication, cookies must be enabled on the client browser. If the client disables cookies, the cookie generated by Forms Authentication is lost and the client will not be able to authenticate.


 Windows Based Authentication

When you use ASP.NET Windows authentication, ASP.NET attaches a WindowsPrincipal object to the current request. This object is used by URL authorization. The application can also use it programatically to determine whether a requesting identity is in a given role.

        If User.IsInRole("Administrators") Then
               DisplayPrivilegedContent()
        End If                 

The WindowsPrincipal class determines roles by NT group membership. Applications that want to determine their own roles can do so by handling the WindowsAuthentication_OnAuthenticate event in their Global.asax file and attaching their own class that implements System.Security.Principal.IPrincipal to the request, as shown in the following example:

' Create a class that implements IPrincipal
Public Class MyPrincipal : Inherits IPrincipal
  ' Implement application-defined role mappings
End Class
 
' In a Global.asax file
Public Sub WindowsAuthentication_OnAuthenticate(
        Source As Object, e As WindowsAuthenticationEventArgs)
  ' Attach a new application-defined class that implements IPrincipal to
  ' the request.
  ' Note that since IIS has already performed authentication, the provided
  ' identity is used.
  e.User = New MyPrincipal(e.Identity)
End Sub                


Passport Authentication

This first installment of a two-part series on Microsoft Passport in ASP.NET applications discusses Passport's basic authentication mechanism and demonstrates the use of related .NET classes. It describes the design and implementation of Passport-enabled Web applications and how such applications communicate with client browsers and Passport servers.

Beginning with a general description of how Microsoft Passport acts as an authentication service, it then describes the sequence of events that occurs when a user (normally a browser client) tries to access a Passport-enabled application. The following section demonstrates the necessary setup steps, and the final section explains how to use ASP.NET classes that wrap the authentication-related functionality that the Passport server provides.

Microsoft Passport as an Authentication Service

E-commerce applications on the Internet use electronic means to identify people trying to reach their enterprise resources. For example, when you create a new Yahoo e-mail account, you enter some personal information along with a user name and a password. The name/password pair becomes your identification when you later check your e-mail messages on the site. This simple authentication mechanism is also applicable to e-commerce applications. The login and password pairs are used to identify site users.

The user-authentication mechanisms that e-commerce applications normally have to implement require the following features:

  1. A graphical user interface (GUI) for sign-up and login
  2. A database of user information (at least user names and passwords)
  3. Authentication logic at the Web server
  4. Log-out functionality, such as deleting (or destroying) server-side session objects

Microsoft .NET Passport, in its most basic form, provides all four of these features wrapped inside an easy-to-use programmatic interface. Passport provides a simple architecture, in which a single .NET Passport class named System.Web.Security.PassportIdentity wraps all authentication functionality. A Passport-enabled Web application developer need only instantiate the PassportIdentity class and use its methods to perform the complete authentication process.

This means Passport-enabled e-commerce application developers can rely on Passport to manage all the authentication features required by their e-commerce sites. In effect, Passport is a reusable authentication component, pluggable directly into an ASP.NET-based e-commerce application, which makes it very suitable for rapid application development.

Single Sign-on

Single sign-on (SSO) is another important benefit of Passport. Microsoft hosts its Passport service on its own servers and allows the use of all Passport-enabled accounts (e.g., all Hotmail and MSN.com accounts) to be authenticated on all Passport-enabled Web applications. This means users with Passport-enabled accounts need to remember only one login password pair to access all partner sites. So Passport not only allows rapid e-commerce application development, but it provides ease for users as well.

On the other hand, if you host your SSO on your own server, you can offer it only to your own user base—not all Hotmail and MSN users. You'll normally find this type of SSO in enterprise integration applications, where the application is meant only for users who belong to a particular trusted domain (e.g., employees of a company).

Microsoft currently sells Passport as a hosted service, like an application service provider (ASP). Passport is not available as a software product or a component you can host on your Web servers. The disadvantage of this strategy is if you want to authenticate your own user base on a Passport-enabled site, you have to implement your own authentication mechanism in addition to Passport.

This disadvantage makes Passport a generally unsuitable authentication solution for enterprise application integration (EAI) projects. In most EAI projects, customers don't want their users authenticated on a third-party server, because third-party authentication unnecessarily exposes their business information. For such applications, SSO solutions from other vendors like Oracle or IBM are better, as they are available as software components that customers can host on their Web servers.

However, B2C e-commerce applications can take advantage of the Hotmail and MSN user base with Passport.


Comments (1)
Thu 22 May 2008

By Jane Wakefield
Technology reporter, BBC News


Plans for a super-database containing the details of all phone calls and e-mails sent in the UK have been heavily criticised by experts.


The government is considering the changes as part of its ongoing fight against serious crime and terrorism.

Assistant Information Commissioner Jonathan Bamford has warned that the UK could be "sleepwalking into a surveillance society".

Others have questioned how such a database could be made secure.


Public confidence

"While the public is "sleepwalking" into a surveillance society, the government seems to have its eyes wide open although, unfortunately, to everything except security," said Jamie Cowper, data protection expert at data protection firm PGP Corporation.

"The bottom line is - information of this nature should only be held if - and only if - it can be demonstrated that an appropriate system of checks and balances is in place and the security of the information being stored is of paramount concern," he added.

Public confidence in the governments' ability to look after data has been dented in recent months with high profile failures, including the loss of a CD carrying all the personal details of every child benefit claimant.


The latest plans being mulled by the Home Office will form part of the proposed Communications Bill, which is due to be considered by MPs later this year.

It is, said a Home Office spokesman, crucial "to ensure that public authorities have access to communications data essential for counter-terrorism and investigation of crime purposes."


Risks


The more people who have access to it the more risks there would be

Chris Mayers, Citrix Systems

It would extend the powers of RIPA (the Regulation of Investigatory Powers Act) which currently allows hundreds of government agencies access to communications data.

Some believe such legislation, which requires government authorities to request information from communication providers, is more than adequate for law enforcement purposes.

"The fight against terrorism doesn't require a centralised database," said Chris Mayers, chief security architect at Citrix Systems, an applications delivery firm.

"Such a database would face threats from both outside and inside. The more people who have access to it the more risks there would be," he said.


Big Brother

The Internet Service Providers' Association said it was seeking more information about the proposals.

"In particular we want to know more about the Government's intentions regarding "modifying the procedures for acquiring communications data," said a spokesman.

In the run-up to RIPA being approved by parliament, human rights campaigner Privacy International argued that such an act would be a dangerous first step towards a "Big Brother" society.

According to Gus Hosein, a senior fellow at Privacy International, the latest proposals could be even more controversial.

"The idea that ISPs need to collect data and send it en masse to central government is, without doubt, illegal," he said.


uk database.JPG

Categories : Knowledge / Amazing
Comments here
Thu 24 Apr 2008

Would be old one but just a refreshing


Contents

What ASP.NET Developers Should Always Do
Where the Threats Come From
ViewStateUserKey
Cookies and Authentication
Session Hijacking
EnableViewStateMac
ValidateRequest
Database Perspective
Hidden Fields
E-mails and Spam
Summary
Related Resources

What ASP.NET Developers Should Always Do

If you're reading this article, you probably don't need to be lectured about the growing importance of security in Web applications. You're likely looking for some practical advice on how to implement security in ASP.NET applications. The bad news is that no development platform—including ASP.NET—can guarantee you'll be writing 100-percent secure code once you adopt it—who tells that, just lies. The good news, as far as ASP.NET is concerned, is that ASP.NET, especially version 1.1 and the coming version 2.0, integrates a number of built-in defensive barriers, ready to use.

The application of all these features alone is not sufficient to protect a Web application against all possible and foreseeable attacks. However, combined with other defensive techniques and security strategies, the built-in ASP.NET features form a powerful toolkit to help ensure that applications operate in a secure environment.

Web security is the sum of various factors and the result of a strategy that goes well beyond the boundaries of the individual application to involve database administration, network configuration, and also social engineering and phishing.

The goal of this article is to illustrate what ASP.NET developers should always do in order to keep the security bar reasonably high. That's what security is mostly about—keep the guard up, never feel entirely secure, and make it harder and harder for the bad guys to hack.

Let's see what ASP.NET has to offer to simplify the job.

Where the Threats Come From

In Table 1, I've summarized the most common types of Web attacks and flaws in the application that can make them succeed.

AttackMade possible by . . .
Cross-site scripting (XSS) Untrusted user input echoed to the page
SQL injection Concatenation of user input to form SQL commands
Session hijacking Session ID guessing and stolen session ID cookies
One-click Unaware HTTP posts sent via script
Hidden field tampering Unchecked (and trusted) hidden field stuffed with sensitive data


More at ....


Take Advantage of ASP.NET Built-in Features to Fend Off Web Attacks

http://msdn2.microsoft.com/en-us/library/ms972969.aspx


Comments (1)


Ads